Table of Contents
It’s 2 a.m., and you’re creeping into the kitchen for a glass of water when the floor emits a big creak that shakes the entire house. Sound familiar?
A squeaky floor is one of the most infuriating little things to happen in a home. Not only does it destroy all the silence at night, but it also becomes a problem when you want to be sneaky, and can even make a room that looks brand new look ancient.
Fortunately, fixing your squeaky floor doesn’t require you to break the bank by calling a costly contractor or having to pull up the floor.
In this guide, I’ll show you how to fix a squeaky floor using 5 DIY tricks. Some take a few minutes, while others take half a day.
Why Do Floorboards Squeak?
A squeak is just two surfaces rubbing together. Here are the most common reasons it happens:
- Wood shrinkage and humidity: Wood swells in damp weather and shrinks in dry weather, which opens tiny gaps between boards.
- Subfloor separation: The plywood subfloor pulls away from the floor joists underneath, so it moves every time you step.
- Loose nails: Old nails work loose, and the board slides up and down on them.
- Board friction: Two neighboring boards rub against each other and make a soft, scratchy sound.
Answer in brief: Squeaky floorboards are due to wood movement. Changes in humidity, nail movement, and space between subflooring and joists cause floorboards to rub against each other when walked upon.
Most floorboard squeaks are not a problem. However, if the area seems to bounce, sinks, or gets worse with time, then the joist under the floor may be damaged.
Which Solution Is Right for Your Floor?
Not all quick fixes will work on all floors. This table helps you determine your starting point.
| Hack | Best For | Difficulty | Time | Cost |
|---|---|---|---|---|
| 1. Baby powder | Hardwood surface squeaks | Very easy | 10 minutes | Under $5 |
| 2. Repair kit | Carpeted floors | Easy | 30 minutes | $15 to $30 |
| 3. Wooden shims | Gaps seen from below | Medium | 30 to 60 minutes | Under $10 |
| 4. Construction adhesive | Long gaps along a joist | Medium | 1 hour | $10 to $15 |
| 5. Joist blocking | Sagging or very loud floors | Hard | 2 to 3 hours | $20 to $60 |
5 Amazing Do-It-Yourself Tricks That Will Solve Your Squeaky Floors Immediately
Trick No. 1 – Baby Powder Fix (Recommended for Hardwood)
It’s an effortless trick that surprisingly works quite effectively on hardwood flooring. Baby powder acts like a dry lubricant, preventing the boards from rubbing against each other.
What you need: Baby powder, a piece of cloth, and a brush.
How to do it:
- Walk slowly across the floor and find the exact spot that squeaks.
- Sprinkle a good amount of powder over the area, right into the gaps between boards.
- Use a soft cloth or brush to work the powder into the cracks.
- Wipe away the extra powder so the floor doesn’t look dusty.
- Step on the spot again to test it.
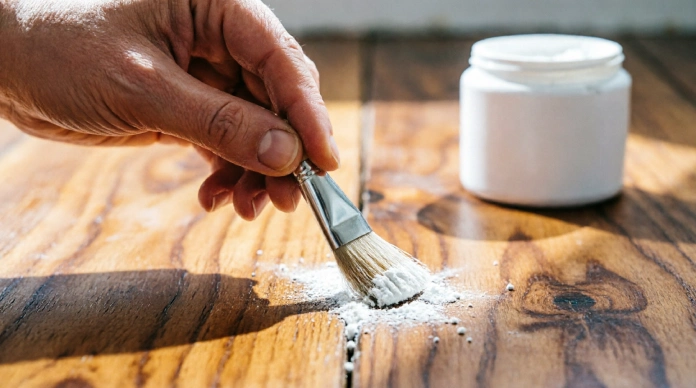
Did you know: This is a temporary solution. It’s great for squeaking noises caused by friction. If it squeaks again after a few weeks, try one of the more robust solutions below.
Hack 2: Using a Squeaky Floor Repair Kit (Ideal for Carpets)
Does your squeaky floor lie under a carpet? There is no need to remove it. A squeaky floor repair kit comes with specialized screws that tighten the subfloor to the joist. For additional guidance, see this guide to repairing squeaky floors under carpeting from This Old House.
The screws come with a breakaway head which disappears underneath the carpet.
What you will need: A squeaky floor repair kit with breakaway screws, a stud finder, and a drill.
How to do it:
- Use a stud finder to locate the floor joist under the squeaky spot. Joists are usually about 16 inches apart.
- Mark the joist with a small piece of tape.
- Place the kit’s depth guide over the carpet and drive the screw through it into the joist.
- Once the screw is tight, snap off the head with the tool that comes in the kit.
- Fluff the carpet fibers with your fingers. The screw will be hidden.
Tip: Drive the screw through the joist, not just the subfloor. If it’s only driven into the subfloor, the squeak will simply reappear.
Hack 3: Driving Wooden Shims into Subfloor Gaps (Cheapest and Best Solution if Done from the Bottom Up)
This repair is inexpensive and extremely effective if you can access the bottom side of the floor. Very often, the source of a squeaky sound is an imperceptible space between the subfloor and the joist. A small piece of wood, placed in such a space, will prevent any movement whatsoever.
Materials you’ll need: Wood shims, wood glue, hammer, and flashlight.
How to do it:
- Have a helper walk on the squeaky spot while you watch from below with a flashlight. You’ll see where the gap opens.
- Put a little wood glue on the shim.
- Tap the shim gently into the gap between the joist and the subfloor.
- Stop when it feels snug. Don’t force it.
- Let the glue dry for several hours before walking on it.
Wrong move: Over-tightening the shim. This will force the floor up, forming yet another hump or squeak.
Hack 4: Fixing Loosely Connected Joists Using Construction Adhesive
If the space between the subfloor and the joist extends over a long distance, a single shim will not be able to deal with it. Instead, use a more durable construction adhesive that will fix all the area between the floor and joist.
What you’ll need: Construction adhesive, caulking gun, and a flashlight.
How to do it:
- From below, find the seam where the subfloor meets the joist.
- Load the adhesive into the caulking gun.
- Run a steady bead along the seam, covering the whole gap.
- Press on the floor above (or have a helper stand on it) so the adhesive grips well.
- Let it cure fully, following the time on the product label.
Did you know: Select adhesives that work on subfloors. Standard caulking material remains flexible and cannot hold down the wood.
Hack 5: Install Joist Blocking or Metal Brackets (For Significant Squeaks)
Are you experiencing a sagging or bouncy floor accompanied by significant squeaking over a large area of flooring? It may be time to reinforce the joists in your house. By installing additional pieces of wood (known as joist blocking or bridging) between joists or installing metal brackets, you will increase the rigidity of your floor.
Items required: Lumber matching the size of your joists, wood screws, metal brackets (if necessary), drill and measuring tape.
How to do it:
- Measure the space between two joists beneath the problem area.
- Cut a piece of lumber to fit tightly between them.
- Fit the block in place and screw it into both joists.
- For extra strength, add a metal bracket at each end.
- Test the floor above to see if the movement is gone.
When to get an expert opinion: In case you find cracked joists, decay, or a sagging floor, stop right there and call in a professional. It may be more serious than just a creak.
How to Fix a Squeaky Floor Under Carpet Without Removing It
This is one of the most searched questions on the topic, so here’s the short version.
- Find the squeak. Walk the area slowly and mark the loudest spots with tape.
- Locate the joist. Run a stud finder across the carpet until you find the edge of a joist, then mark its center. Joists are usually 16 inches apart, so once you find one, the rest are easy to find.
- Drive a breakaway screw. Use a repair kit and drive the screw into the joist, just like in Hack 2.
- Snap and fluff. Snap off the screw head and fluff the carpet over it.
That’s it. No lifting the carpet, no mess, and the floor is quiet again in under 30 minutes.
Common Mistakes to Avoid When Fixing Squeaky Floors
A few small errors can turn a quick fix into a bigger headache. Watch out for these:
- Using regular nails. They work loose over time and the squeak comes back. Screws hold much better.
- Hammering shims too hard. This can lift the floor or crack the wood. Tap gently until it feels snug.
- Screwing into the subfloor only. The board still moves against the joist, so make sure the screw reaches it.
- Ignoring humidity. Wood keeps swelling and shrinking, so squeaks return. Try to keep indoor humidity around 30% to 50%.
- Skipping the test. Always walk on the spot again after each fix so you know it worked.
For more beginner-friendly projects, explore our DIY home improvement tutorials to learn how to tackle other common household tasks.
Quick Tips to Keep Your Floors Quiet
- Use a humidifier in dry winter months and a dehumidifier in damp summers.
- Check your floors once or twice a year and fix new squeaks early.
- Keep furniture on felt pads so heavy pieces don’t put constant pressure on one spot.
- Don’t ignore a squeak that keeps getting louder. It’s often a sign that something is loosening.
If you’re exploring different flooring materials for your home, check out our kitchen flooring ideas for practical and stylish options.
Frequently Asked Questions
Can I make a squeaking floor stop squeaking without taking up the carpet?
Yes. You can use a squeaky floor repair kit that comes with breakaway screws and will allow you to fasten the subfloor to the joist through the carpet.
Will baby powder eliminate squeaks in the floor?
Sure, but it is only going to help in case of slight squeaks because it reduces the amount of friction between boards. In case of deep squeaks, you would require some screwing or glueing or other fix.
Why does my floor start squeaking during cold weather?
Heated air dries it out, and then it makes wooden boards shrink and create gaps between each other.
Is squeaking a floor a sign of its being damaged?
Generally not. Squeaking occurs due to natural wood contraction. However, if your floor also tends to sag and creak, call a specialist to examine your joists.
How much will it cost me to fix my squeaking floor?
A do-it-yourself project should cost around $5-$60. Paying for a professional service will cost several hundred dollars, so these tips can save you quite a lot of money.
Conclusion: Bid Farewell to Noisy Floors
There is no reason to put up with a squeaky floor when help is right at your fingertips. Learning how to fix a squeaky floor can be simple with mess-free solutions, such as sprinkling baby powder on wooden floors or using a repair kit on carpeted floors. If the squeak persists, you can try other effective techniques, including shims, construction adhesives, or blocking, to silence the noise and enjoy quieter floors.
Here is a summary:
- Baby powder for light hardwood squeaks.
- Repair kit for carpeted floors.
- Wooden shims for small gaps seen from below.
- Construction adhesive for long seams.
- Joist blocking for serious or widespread squeaks.
Give one of these a try this weekend, and enjoy a quiet, peaceful home again.
Which hack worked for your floor? Tell us in the comments below!